# Automating Arch Linux Part 3: Creating a Custom Arch Linux Installer
In this three-part series, I will show you one way to simplify and manage multiple Arch Linux systems using a custom repository, a set of meta-packages and a scripted installer. Each part is standalone and can be used by its self, but they are designed to build upon and complement each other each focusing on a different part of the problem.
- Part 1: Hosting an Arch Linux Repository in an Amazon S3 Bucket
- Part 2: Managing Arch Linux with Meta Packages
- Part 3: Creating a Custom Arch Linux Installer
The Arch Linux install process can be quite daunting to new users, but once you understand it, it becomes quite elegant in its simplicity. The best part is that it's command line based with little abstraction built on top of it. This makes it easy to automate through bash scripting and over the years I have done just that. In this post, I will go through this script and show you how to custom it to your own tastes.
Note that this is not a general purpose Arch Linux installer, but more a guide to creating your own installer specific to your needs. I do not recommend directly using my installer - it is likely to change without notice. Instead, fork it and make it your own.
This guide is also not a tutorial on installing ArchLinux, it assumes some basic knowledge of the install process and shows you how to script it. Beginners should first go through the official install guide and be able to create a working Arch Linux system before following this guide.
# Setting Variables and Collecting User Input
Not all variables should be hard-coded into the scripts as they are different on each system such as the host name or which disk to use. There are also settings that you might not want to bake into a script such as your username and password. Therefore we require a way to customise the script on each install. The simplest way is to add some variables to the top of the script for everything you want, blanking out any secrets you don't want to share.
hostname="myhost"
But then the user is forced to download and edit the script before they can run it.
You can get these values from the command line arguments.
hostname="${1}"
Or better yet, throw an error and halt the install process on missing input.
hostname="${1:?"Missing hostname"}"
There are many other useful things you can do with bash's parameter substitution, which are worth looking up if you want to write bash scripts to automate things.
But I always forget the order of these arguments and being prompted stops the
need to look it up every time. You can do this with the read builtin.
echo -n "Hostname: "
read hostname
: "${hostname:?"Missing hostname"}"
Note that : is a no-op, we are using it to test the validity of the
hostname variable and to exit early if it is blank (i.e. the user hit enter
without typing anything).
For passwords, you should turn off echoing with -s, echo a blank line (as the
new line char is also not printed) and confirm the password with a second
prompt to avoid typos locking the user out accidentally.
echo -n "Password: "
read -s password
echo
echo -n "Repeat Password: "
read -s password2
echo
[[ "$password" == "$password2" ]] || ( echo "Passwords did not match"; exit 1; )
But the Arch live disk comes with the dialog utility, this opens up another option for collecting user input.
hostname=$(dialog --stdout --inputbox "Enter hostname" 0 0) || exit 1
: ${hostname:?"hostname cannot be empty"}
Or use --passwordbox instead of --inputbox for passwords. Dialog also lets
us do more complicated things like displaying a list of disks for the user to
pick from.
devicelist=$(lsblk -dplnx size -o name,size | grep -Ev "boot|rpmb|loop" | tac)
device=$(dialog --stdout --menu "Select installation disk" 0 0 0 ${devicelist}) || exit 1
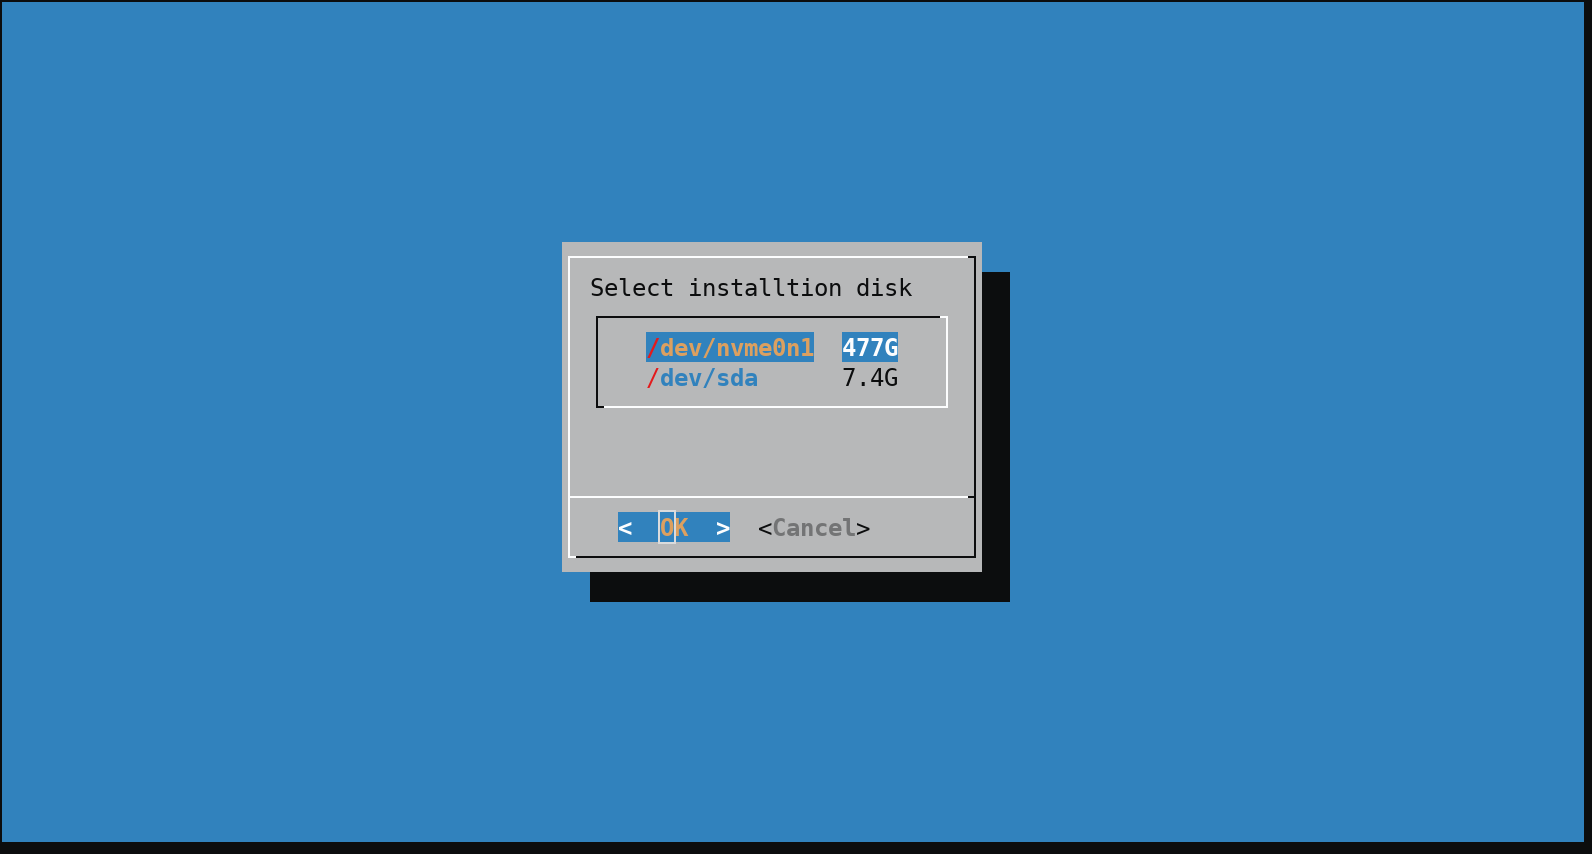
In addition to looking fancy, this also reducing the amount of typing and therefore typos.
The list is sorted by reverse size which puts the disk you likely want at the top.
# Partitioning and Formatting the Disk
Most people are familiar with fdisk or gdisk for partitions their disk. But
you might want to consider their lesser used sisters, cfdisk and cgdisk if
you prefer a more interactive approach. Whichever you prefer you can launch it
with a disk to let the user format it however they want.
gdisk "${device}"
This works fine inside a script, you are able to interact with it like you are user as well, and when you exit it our script will continue.
The major problem with this interactive approach is figuring out the formatting and layout the user wants or expected for that install. You are mostly forced to ask the user what they want to do with each partition they created, which complicates the script and install process quite a bit. Or just assume a layout and hope the user formatted it correctly.
Alternatively, if most or all of your systems are formatted identically, you can hard-code the layout into the script. This keeps the script simpler with fewer steps to go through. In the event that you do need a custom disk layout for some special case, you can download and manually edit the script or even delete the formatting section entirely and formatting it manually beforehand.
parted --script "${device}" -- mklabel gpt \
  mkpart ESP fat32 1Mib 129MiB \
  set 1 boot on \
  mkpart primary linux-swap 129MiB 2177MiB \
  mkpart primary ext4 2177MiB 100%
You can make this more flexible by allowing the user to specify the size of the ESP or swap space, or even calculate the swap based on the available ram.
swap_size=$(free --mebi | awk '/Mem:/ {print $2}')
swap_end=$(( $swap_size + 129 + 1 ))MiB

parted --script "${device}" -- mklabel gpt \
  mkpart ESP fat32 1Mib 129MiB \
  set 1 boot on \
  mkpart primary linux-swap 129MiB ${swap_end} \
  mkpart primary ext4 ${swap_end} 100%
Note that I work in MiB to allow parted some freedom to align the partitions correctly and as such add an extra meg to the size to account for rounding errors.
Before we can format the partitions, we need a reference to their device file. For most systems this is trivial, just add the partition number to the device file.
part_boot="${device}1"
But I found a couple of systems that this does not work. Instead, you may need
to add p1 to the device file instead. You should be familiar with this if
your system is one of them, but generally, this is laptops with /dev/mmcblk0
or /dev/nvme0n1 disks.
part_boot="${device}p1"
To generalise over these two types of disks you can use ls and grep to find
and filter the actual partition. I found the bashes globing was not powerful
enough to filter out just a single partition while ignoring device files such
as /dev/mmcblk0boot1 that also exist on some systems.
part_boot="$(ls ${device}* | grep -E "^${device}p?1$")"
Once you have identified the partitions, format and mount them to your desired locations.
mkfs.vfat -F32 "${part_boot}"
mkswap "${part_swap}"
mkfs.f2fs -f "${part_root}"

swapon "${part_swap}"
mount "${part_root}" /mnt
mkdir /mnt/boot
mount "${part_boot}" /mnt/boot
Note that if you want swap you should enable the swap partition to ensure that
genfstab picks it up correctly.
# Install the System and Boot Loader
We are ready to pacstrap the system with any and all packages you want on your
final system. I use the meta-packages I created in part 2, which will, in
turn, install all the packages I want on my base system. For this, I need to
append my repository to the end of /etc/pacman.conf before running pacstrap.
cat >>/etc/pacman.conf <<EOF
[mdaffin]
SigLevel = Optional TrustAll
Server = $REPO_URL
EOF

pacstrap /mnt mdaffin-desktop
Now to make our system actually bootable we must install a boot loader. I use
UEFI on my systems and as such use bootctl. For commands that you want to run
inside the context of your installed system wrap them with arch-chroot /mnt.
arch-chroot /mnt bootctl install

cat <<EOF > /mnt/boot/loader/loader.conf
default arch
EOF

cat <<EOF > /mnt/boot/loader/entries/arch.conf
title    Arch Linux
linux    /vmlinuz-linux
initrd   /initramfs-linux.img
options  root=PARTUUID=$(blkid -s PARTUUID -o value "$part_root") rw
EOF
# Configuring the System
The last thing we need to do is configure the system. This stage is quite short for my systems as most of the work is done by the meta-packages that I created in part 2. If you choose not to use meta-packages then expand this as much as you require. You can automate the configuration of your entire set up if you want to or bootstrap configuration managers like SaltStack or Ansible if you want to get really fancy.
At a minimum run genfstab
genfstab -t PARTUUID /mnt >> /mnt/etc/fstab
Set your host name
echo "${hostname}" > /mnt/etc/hostname
Create a user and set roots password
arch-chroot /mnt useradd -mU -s /usr/bin/zsh -G wheel,uucp,video,audio,storage,games,input "$user"
arch-chroot /mnt chsh -s /usr/bin/zsh

echo "$user:$password" | chpasswd --root /mnt
echo "root:$password" | chpasswd --root /mnt
# Other Useful Bits
A couple of other bits in the script that have nothing to do with installing Arch Linux but improve the error handling and make it easier to debug problems.
First, there is my standard preamble, hardening the script against failure, which if you have been following my posts you should start to recognise.
#!/bin/bash
set -uo pipefail
trap 's=$?; echo "$0: Error on line "$LINENO": $BASH_COMMAND"; exit $s' ERR
And since the terminal on a live USB does not offer the ability scrolling by
default it is easy to lose the output and errors from programs as they scroll
off the screen. Most of the time this is not an issue, but when something goes
wrong you wish you had it. To get around this I redirect stdout and stderr of
the script to the tee command. This splits the stream, continuing to output
it to the screen but also writes it to a log file in case there is a need to
inspect it later.
exec 1> >(tee "stdout.log")
exec 2> >(tee "stderr.log")
I also ensure NTP is enabled to ensure the clock has not drifted for any reason.
timedatectl set-ntp true
# The Complete Installer Script
Here is my version, at the time of writing, of the installer script in its
entirety. You can find my live/latest incarnation in my [arch-pkgs] git
repository alongside all of the other resources I discuss in this series. I
highly recommend that you start with this as a base, fork it or place it in
your own repository and customise it to your liking. My version is likely to change
in the future as I evolve how I run my systems.
#!/bin/bash
# WARNING: this script will destroy data on the selected disk.
# This script can be run by executing the following:
#   curl -sL https://git.io/vNxbN | bash
set -uo pipefail
trap 's=$?; echo "$0: Error on line "$LINENO": $BASH_COMMAND"; exit $s' ERR

REPO_URL="https://s3.eu-west-2.amazonaws.com/mdaffin-arch/repo/x86_64"

### Get infomation from user ###
hostname=$(dialog --stdout --inputbox "Enter hostname" 0 0) || exit 1
clear
: ${hostname:?"hostname cannot be empty"}

user=$(dialog --stdout --inputbox "Enter admin username" 0 0) || exit 1
clear
: ${user:?"user cannot be empty"}

password=$(dialog --stdout --passwordbox "Enter admin password" 0 0) || exit 1
clear
: ${password:?"password cannot be empty"}
password2=$(dialog --stdout --passwordbox "Enter admin password again" 0 0) || exit 1
clear
[[ "$password" == "$password2" ]] || ( echo "Passwords did not match"; exit 1; )

devicelist=$(lsblk -dplnx size -o name,size | grep -Ev "boot|rpmb|loop" | tac)
device=$(dialog --stdout --menu "Select installation disk" 0 0 0 ${devicelist}) || exit 1
clear

### Set up logging ###
exec 1> >(tee "stdout.log")
exec 2> >(tee "stderr.log")

timedatectl set-ntp true

### Setup the disk and partitions ###
swap_size=$(free --mebi | awk '/Mem:/ {print $2}')
swap_end=$(( $swap_size + 129 + 1 ))MiB

parted --script "${device}" -- mklabel gpt \
  mkpart ESP fat32 1Mib 129MiB \
  set 1 boot on \
  mkpart primary linux-swap 129MiB ${swap_end} \
  mkpart primary ext4 ${swap_end} 100%

# Simple globbing was not enough as on one device I needed to match /dev/mmcblk0p1
# but not /dev/mmcblk0boot1 while being able to match /dev/sda1 on other devices.
part_boot="$(ls ${device}* | grep -E "^${device}p?1$")"
part_swap="$(ls ${device}* | grep -E "^${device}p?2$")"
part_root="$(ls ${device}* | grep -E "^${device}p?3$")"

wipefs "${part_boot}"
wipefs "${part_swap}"
wipefs "${part_root}"

mkfs.vfat -F32 "${part_boot}"
mkswap "${part_swap}"
mkfs.f2fs -f "${part_root}"

swapon "${part_swap}"
mount "${part_root}" /mnt
mkdir /mnt/boot
mount "${part_boot}" /mnt/boot

### Install and configure the basic system ###
cat >>/etc/pacman.conf <<EOF
[mdaffin]
SigLevel = Optional TrustAll
Server = $REPO_URL
EOF

pacstrap /mnt mdaffin-desktop
genfstab -t PARTUUID /mnt >> /mnt/etc/fstab
echo "${hostname}" > /mnt/etc/hostname

cat >>/mnt/etc/pacman.conf <<EOF
[mdaffin]
SigLevel = Optional TrustAll
Server = $REPO_URL
EOF

arch-chroot /mnt bootctl install

cat <<EOF > /mnt/boot/loader/loader.conf
default arch
EOF

cat <<EOF > /mnt/boot/loader/entries/arch.conf
title    Arch Linux
linux    /vmlinuz-linux
initrd   /initramfs-linux.img
options  root=PARTUUID=$(blkid -s PARTUUID -o value "$part_root") rw
EOF

echo "LANG=en_GB.UTF-8" > /mnt/etc/locale.conf

arch-chroot /mnt useradd -mU -s /usr/bin/zsh -G wheel,uucp,video,audio,storage,games,input "$user"
arch-chroot /mnt chsh -s /usr/bin/zsh

echo "$user:$password" | chpasswd --root /mnt
echo "root:$password" | chpasswd --root /mnt
# Hosting and Running the Installer
Running the script is as simple as downloading it from the Arch Linux live USB/CD and running the script. To make this easier, since you often cannot copy in the live environment, you can use a URL shortener such as git.io or goo.gl to make the URLs easier to type. Remember to use the raw link to the script if you host it on GitHub or similar sites. Once you have the URL I recommend adding it to the top of the script or a README in the repository for easy reference later.
Here is the curl line I use in my script.
curl -sL https://git.io/vNxbN | bash
You can also download the script, modify it if required and run it locally. This can be useful when setting up a system that diverges slightly from your standard setup or if you want to customise it further.
# Conclusion
Now you have fully automated the Arch Linux install process, and when combined with my previous posts in this series, the whole configuration side of things as well. I have been using this script in some form or another for several years now and the best part of it is how easy it is to hack and change either before you download the script or just before you run it.
You can even take this a step further and bake the installer into a custom arch ISO. But I did not find this worth the effort unless you want to automate the installation of Arch Linux on multiple identical systems, such as running Arch with a kiosk browser on a bunch of monitors.